

Ship parcels
Leverage our bundled APIs to quickly build and deploy ecommerce shipping solutions
Required API products


Getting started
Before integrating our shipping APIs, make sure you complete the following prerequisites and setup steps. For a more detailed overview, refer to the QuickStart guide.
Prerequisites
Please note: To use our APIs, you must first have a valid Canada Post business account, which provides a customer number. Commercial customers typically have a formal commercial contract, which also provides a contract number and is billed to a credit account. Solutions for Small Business™ customers can access the API using their small business account number. Returns services are generally billed to the credit card on file in your profile or business account.
Once you have an account, here are the next steps to use the API:
- Create a canadapost.ca user ID.
- Join the Canada Post Developer Portal.
- Get your production and test API credentials (API Key and API Secret).
API endpoints
Production environment
https://api.canadapost-postescanada.ca/prod/devportal-portaildesdeveloppeurs/shipping/v1/{mailedBy}/{mobo}/shipment Required headers
| Header name | Required status | Description/Purpose |
|---|---|---|
| Content-Type | Mandatory Example value/Format Unique per service group. Refer to API documentation for details. | This is the JSON version of the body you’re sending in the POST. Please note: */* in place of the header value will return an error. |
| Accept | Mandatory Example value/Format Unique per service group. Refer to API documentation for details or use "media-type" from the provided link returned in the response. | This is the JSON version of the response you’re expecting to receive. Please note: */* in place of the header value will return an error. |
| Authorization | Mandatory Example value/Format Bearer | Carries the access token to authenticate the request. Details:
|
| Accept-Language | Optional Example value/Format "en-CA" or "fr-CA" | This indicates the preferred language for any human-readable error messages that may be generated. |
Available shipping services
We offer both domestic and international shipping services. Below is a categorized list of commonly supported services, including the service codes required for all API requests.
Domestic services
(within Canada)
| Service name | API service code | Benefits |
|---|---|---|
| Regular Parcel™ | DOM.RP | Cost-effective ground shipping. |
| Expedited Parcel™ | DOM.EP | Faster delivery with tracking. |
| Xpresspost™ | DOM.XP | Guaranteed next-day or 2-day delivery in major urban centres. |
| Priority™ | DOM.PC | Fastest delivery option with tracking and signature. |
| Library Materials | DOM.LIB | Special, economical service for shipping library materials (books, and so on). |
Services to the U.S.
(shipping to the United States)
| Service name | API service code | Benefits |
|---|---|---|
| Expedited Parcel™ – USA | USA.EP | Delivery in as little as 4 business days for larger parcels. Tracking included. |
| Xpresspost™ – USA | USA.XP | Delivery in 2 to 3 business days. Guaranteed service with tracking. |
| Tracked Packet™ – USA | USA.TP | Cost-effective option for small and lightweight items. Includes tracking. |
| Small Packet™ USA – Air | USA.SP.AIR | Economical service for small, low-value items. No tracking included. |
International services
| Service name | API service code | Benefits |
|---|---|---|
| Xpresspost™ – International | INT.XP | Guaranteed, fast delivery in as little as 4 business days to major markets. Includes tracking. |
| Tracked Packet™ – International | INT.TP | Cost-effective option for small and lightweight items to select countries. Includes tracking. |
| Small Packet™ International – Air | INT.SP.AIR | Economical air service for small, low-value items. No tracking included. |
| Small Packet™ International – Surface | INT.SP.SURF | Cheapest option for small, low-value items. Delivery can take 1 to 3 months. |
| International Parcel – Air | INT.IP.AIR | Standard air service for larger parcels. Includes tracking for many destinations. |
| International Parcel – Surface | INT.IP.SURF | Standard ground/sea service for larger parcels. Long transit times (1 to 3 months). |
Shipping options
Shipping options are selected by providing the appropriate optionCode (for example, SO or COV) in your API requests. Options can be used together or independently, though some may conflict with others or require additional data.
View a full list of valid codes and their descriptions
| Option name | API service code | Benefit/Technical requirement |
|---|---|---|
| Signature | SO | Ensures the package is signed for upon delivery. |
| Coverage (insurance) | COV | Adds declared value coverage. Requires theoptionAmount field (or a special qualifier for maximum coverage). |
| Collect on Delivery (COD) | COD | Collects payment from the receiver upon delivery. Requires theoptionAmount field (the amount to collect). |
| Delivery Confirmation | DC | Confirms when the item is delivered. This is included with most tracked services like Expedited Parcel™. |
| Proof of Age | PA18, PA19, PA21 | Ensures delivery is made only to a receiver who meets the specified age (must use one of the codes: PA18, PA19, or PA21). |
| Card (Hold) for Pickup | HFP | Canada Post holds the item at a designated post office, notifying the receiver to pick it up. |
| Do Not Safe Drop | DNS | Prevents Canada Post from leaving the item in a safe location if the receiver is unavailable. |
| Leave at Door (Do not Card) | LAD | Allows Canada Post to leave the item at the receiver's door without leaving a Delivery Notice Card. |
| Deliver to Post Office | D2PO | The parcel is delivered directly to a nearby post office instead of the receiver's address. |
Shipping options sample request
{
  "serviceCode": "DOM.XP",
  "options": [
    {
      "optionCode": "SO",
      "optionAmount": "0.00"
    },
    {
      "optionCode": "COV",
      "optionAmount": "100.00"
    }
  ]
}
Non-delivery handling options
For international and U.S. shipments that are undeliverable, a non-delivery handling instruction must be specified in the API request. This determines the parcel’s fate if delivery fails.
| Option name | API code | Handling instruction | Cost implication |
|---|---|---|---|
| Return at Sender’s Expense | RASE | The item is returned to the original sender. | Sender pays the return shipping costs. |
| Return to Sender | RTS | The item is returned to the original sender. | Typically, no additional cost (often included in base price). |
| Abandon | ABAN | The item isn’t returned and is disposed of or handled according to destination country regulations. | No return cost, but no recovery of goods. |
Please note: These options are required for many services, particularly commercial-format parcels like International Parcel – Air/Surface and Expedited Parcel™ – USA. Omission for required services will result in a validation error.
Packaging indicators
These indicators are passed in the parcelCharacteristics element of your API request. They impact rate calculation and handling.
| Indicator | API field name (Boolean) | Description and surcharge logic |
|---|---|---|
| Mailing tube | mailingTube: true | Applies to cylindrical packages (posters, blueprints). Incurs a surcharge. |
| Unpackaged | unpackaged: true | Applies if the item isn’t fully contained, has loose wrapping, or is irregularly shaped (for example, tires). Incurs a surcharge. |
| Oversized | oversized: true | Applies if the item exceeds Canada Post's standard dimensions or weight limits. |
Important implementation notes:
- You must manually set
mailingTubeorunpackagedto true if your item meets those conditions. - The API will typically set the
oversizedflag automatically if you provide dimensions that exceed the maximum size thresholds. - We only apply one surcharge. If the
unpackagedsurcharge applies, theoversizedsurcharge will be waived.
Packaging indicator sample request
{
  "parcelCharacteristics": {
    "weight": 1.2,
    "dimensions": {
      "length": 60,
      "width": 10,
      "height": 10
    },
    "mailingTube": true
  }
}
Use cases
The following are typical scenarios that customers might encounter when integrating with our shipping APIs. Each use case is further illustrated using a call diagram, giving further clarity on the flow of data or requests and the parameters needed to make these calls.
Example 1
Get rates for shipping services
When you call Get Rates, you provide the characteristics of a given package in your request. All eligible shipping services and costs will be returned in the JSON data. You or your customer (depending on your implementation) can then select the preferred shipping method based on speed and cost.
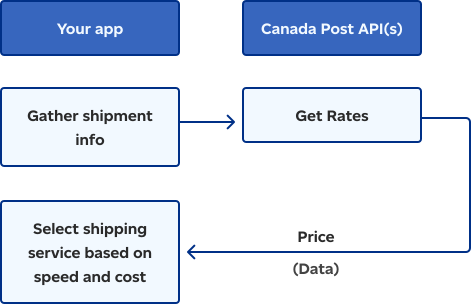
This flowchart outlines the process of getting shipping rates using a Canada Post API. It begins with the customer application gathering shipment information, which is then sent to the API. The pricing data is returned to the customer application, and the user selects the shipping service based on the information (speed and cost) provided.
Example 2
Print shipping labels
(plain paper or thermal)
When you create a shipment, you can specify if you want:
- Labels in thermal or plain paper format
- PDF encoding for the labels
- Email notification options for tracking (for commercial customers, shipment tracking events begin once the manifest has been transmitted)
- A return shipping label
- Pricing information
- A QR code
The following image illustrates the minimum call set to get a label image.
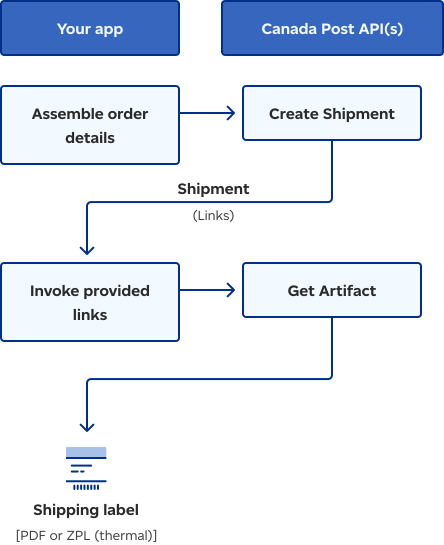
This flowchart outlines the process of printing shipping labels using a Canada Post API. The customer application initiates the process by assembling the order details and sending them to the Canada Post API. The API then returns shipment links to the customer application, which uses these links in the Get Artifact call. The final output is the shipping label in PDF or ZPL (thermal) format, ready for printing.
Example 3
Print a domestic shipping label with a return label
You may want to print a return label to include with an outgoing shipment. The return label isn’t billed to your account until it’s affixed to the outside of a return shipment and passes through the mail stream.
The domestic shipping label and return label links are returned to you in the same single response to the Create Shipment request, providing return label details with your request. You can invoke the label links in any order (for example, shipping or return label first).
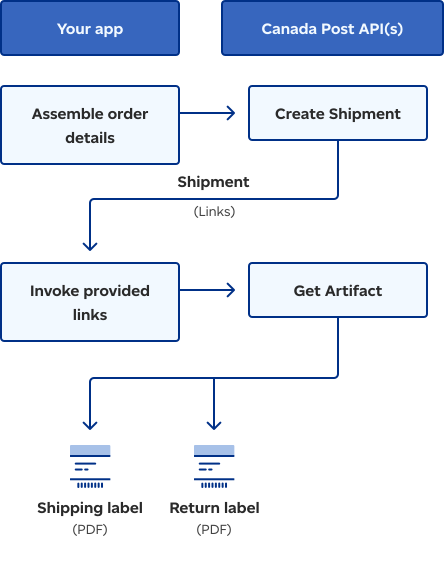
This flowchart outlines the process of printing a domestic shipping label with a return label using a Canada Post API. The process begins with the customer application assembling the order details. These details are then sent to the Canada Post API. In response, the API provides shipment links back to the customer application. The application uses these links to make a Get Artifact call to the Canada Post API. The API returns the requested artifact, which includes both the shipping label and the return label. The final output is both labels in PDF format, ready for printing.
Example 4
Get Canada Post charges for a shipment
You can make a call to get the Canada Post charges for your domestic, U.S., or international shipment.
Add the call Get Shipment Price to any use case that starts with Create Shipment.
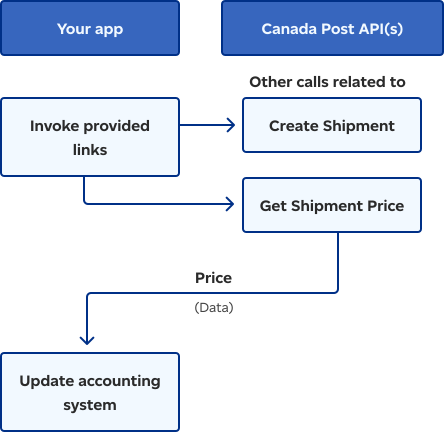
This flowchart outlines the process of getting Canada Post charges for a shipment using a Canada Post API. The process begins with the customer application invoking the provided links, which are then sent to the Canada Post API. The API handles all necessary calls. The API returns the pricing data to the customer application, which then updates the accounting system.
Example 5
Ad hoc or batch call patterns
You can execute the label printing use cases using 1 of 2 call patterns:
- Ad hoc: One order at a time as a packer is ready for it
- Batch: Store many orders and then print them all at once
Shipment information is stored on Canada Post servers from the time you create it until 90 days after it’s transmitted.
The following diagram shows how to execute ad hoc and batch patterns.
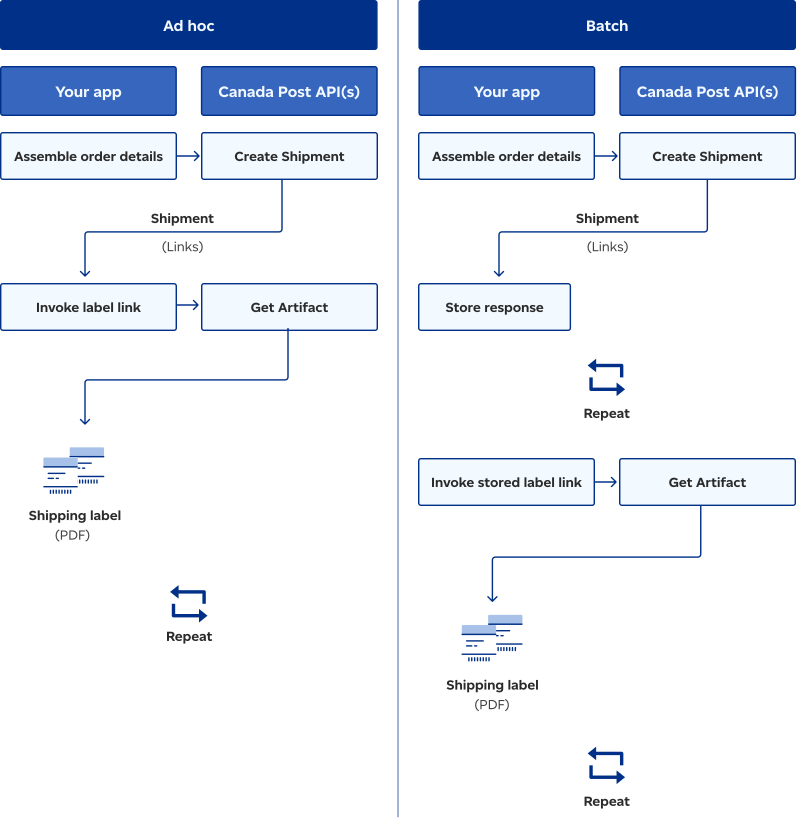
This flowchart outlines the two distinct processes for processing orders using ad hoc and batch Canada Post API call patterns. In the ad hoc process, each order is processed individually, with shipping labels generated immediately after order details are submitted. In the batch process, multiple orders are accumulated before being processed together, with shipping labels generated in bulk once all orders are collected. Both methods involve sending order details to the Canada Post API, receiving shipment links, requesting shipping label artifacts, and ultimately producing printable PDF shipping labels.
Example 6
Synchronize calls for shipments
Your application can store links for later use (as described in the batch call pattern) or your application can use the synchronization calls to get links from Canada Post. If your application normally stores links but suffers a failure and loss of data, the synchronization calls can be used to recover from the data loss.
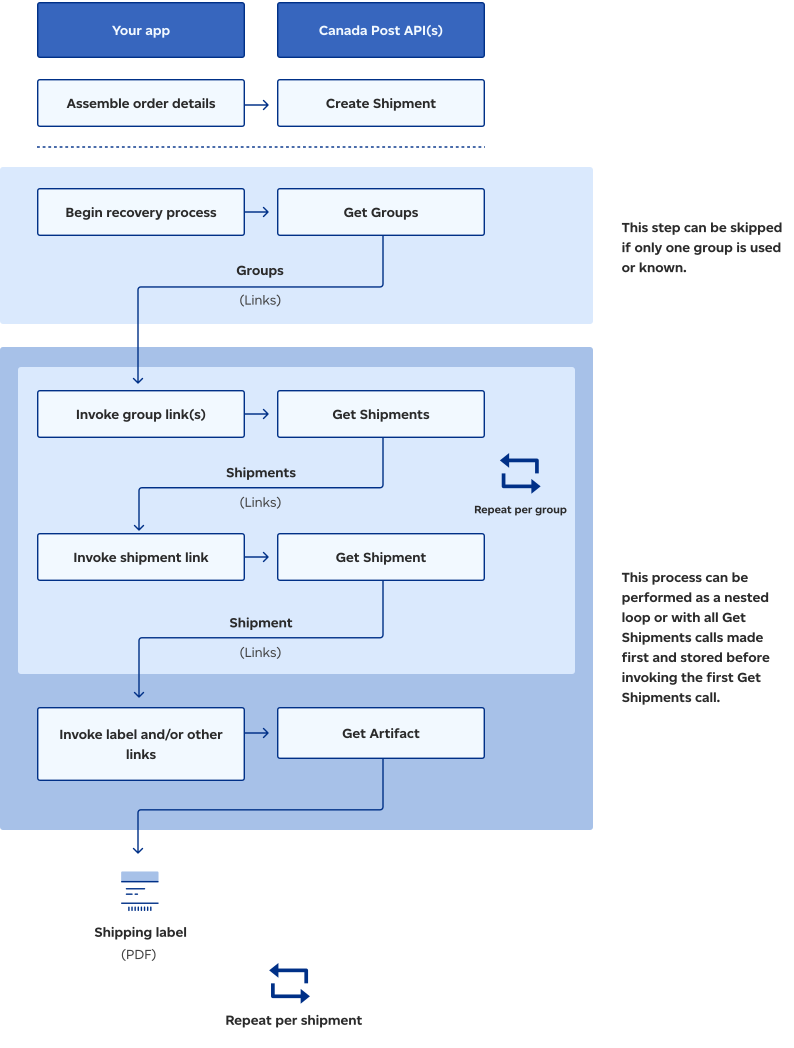
This flowchart visually represents how an application interacts with the Canada Post API to manage data recovery of shipment information through synchronization calls. The process begins with the customer application inputting order details, which are then sent to the Canada Post API to create a shipment. If necessary, the application can recover lost shipment data by requesting group links from the Canada Post API and then using those links to retrieve individual shipment details. Once all shipment data is collected, the application produces printable PDF shipping labels for each shipment.
Example 7
Transmit your shipments to receive a manifest
Unless you use only one group, it’s best to start with the synchronization call Get Groups to determine which groups contain shipments eligible for transmission.
The purpose of a group-id is to group several shipments together to include on the same manifest. You can execute the label printing use cases using one of two call patterns:
Performance limitations
To avoid a timeout of our servers, follow these recommendations:
- Don’t include more than 30 groups per manifest meaning no more than 30 group-ids in one Transmit Shipments request
- Don’t put more than 5,000 shipments in one group
System limitations
To avoid an error, don’t exceed the following limits before performing a Transmit Shipments call:
- Maximum of 50 groups per manifest (error 9109 if exceeded)
- Maximum of 10,000 shipments in one group (error 9110 if exceeded)
- Maximum 10,000 shipments across multiple groups (error 9108 if exceeded)
The group-at-a-time transmit pattern is below. You can also loop your transmits per group, storing all the manifest links before looping for the manifest artifacts.
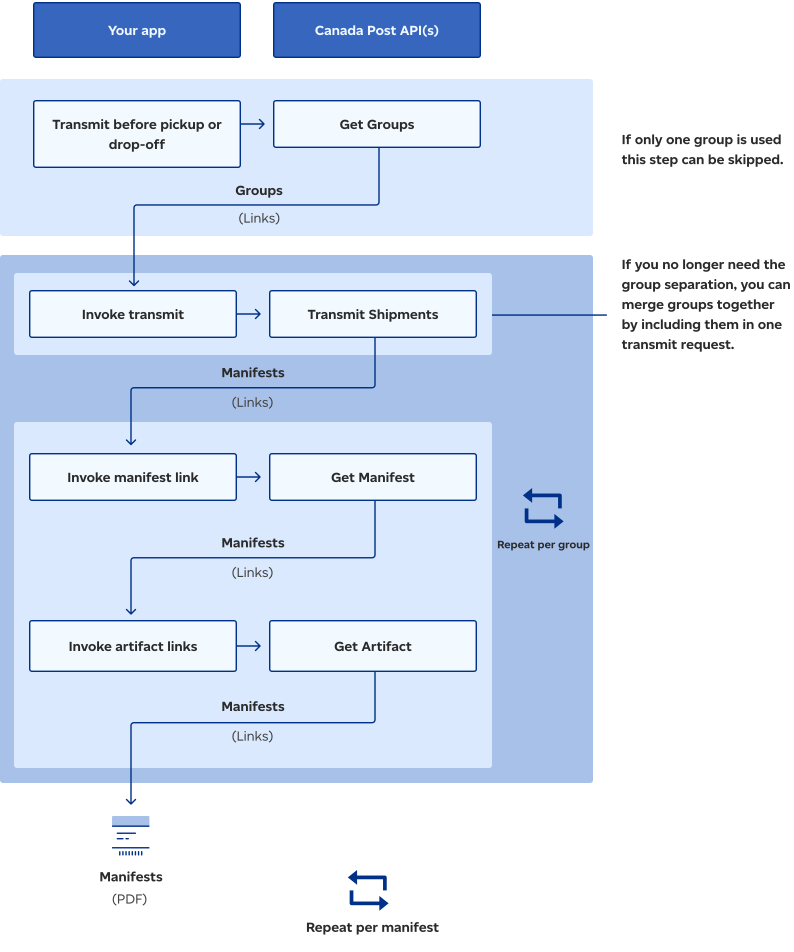
This flowchart outlines the process for generating shipping manifests using the Canada Post API. Shipment data is received by the customer application and transmitted to the API, often divided into groups. For each group, the API provides manifest links, from which actual manifests (PDFs) are retrieved. This process is repeated for all groups, resulting in a set of printable shipping manifests.
Example 8
Retrieve manifest details
Manifest details are available as XML data. Links to the data are returned at the same time as links to the manifest document from a Get Manifest request.
To retrieve the JSON data, add an invocation of Get Manifest Details in the Transmit your shipments to receive a manifest process flow before or after invoking the artifact link. You can use the XML details to update your back-end accounting systems.
If manifest links are lost or intentionally not stored, you can use the synchronization call Get Manifests with a date range of today’s date to retrieve links for all manifests created by Transmit Requests.
Best practices
The following workflow illustrates a scenario where Canada Post APIs have been integrated into an online store.
Select any link in the workflow for further details.
Shopping and checkout
Shipping prices can be passed to shoppers using the Get Rates call, if desired.
Store customer orders on your platform
Fulfillment
- Get rates for our shipping services using the Get Rates call.
- Print labels using the Create Shipments call.
- Update your accounting system using the Get Shipment Price call.
Drop-off or pickup
Get proof of payment (manifest) for a group of shipments using the Transmit Shipments call.
Testing and troubleshooting
Developers must decide when to expose an error message directly to the end-user versus implementing a mitigation strategy to prevent the error.
Common errors and how to fix them
Before troubleshooting, review our list of common errors and their codes. Each entry includes the specific HTTP status code and the recommended mitigation action.
Example: A 9112 error ("Service not available") may indicate a configuration problem. The mitigation is to check the available services for the selected origin or destination.
API error response structure
API error responses typically return a 400 Bad Request (for input validation errors) or a 500 Internal Server Error (for unexpected issues). The response body will contain a structured error object with the following key elements:
- code: The specific alphanumeric error code (for example, 9111).
- message: A plain text description of the error.
Developer support
If you've implemented the recommended mitigation strategies and are still experiencing issues, please contact our developer support team.