

Enable self-service returns
Build seamless return experiences using our Authorized Returns API
Required API products

Getting started
Before integrating the Authorized Returns API, make sure you complete the following prerequisites and setup steps. For a more detailed overview, refer to the QuickStart guide.
Prerequisites
Please note: To use the API, you must first have a valid Canada Post business account, which provides a customer number. Commercial customers typically have a formal commercial contract, which also provides a contract number and is billed to a credit account. Solutions for Small Business™ customers can access the API using their small business account number. Returns services are generally billed to the credit card on file in your profile or business account.
Once you have an account, here are the next steps to use the API:
- Create a canadapost.ca user ID.
- Join the Canada Post Developer Portal.
- Get your production and test API credentials (API Key and API Secret).
API endpoints
Production environment
https://api.canadapost-postescanada.ca/prod/devportal-portaildesdeveloppeurs/returns/v1/{mailedBy}/{mobo}/authorized-returnsPlease note: While there’s no charge for generating the return label itself, we recommend testing in the test environment to prevent the accidental creation of live shipments or triggering downstream inventory and fulfillment processes. If you need to view the final, high-fidelity barcode and QR code, you’ll need to generate a label in the production environment.
Required headers
Authorized Returns v2
- Content-Type: application/vnd.cpc.apic.authreturn+json
- Accept: application/vnd.cpc.apic.authreturn+json
- Authorization: Bearer
- HTTP method: POST
Return label options
Use the following return label options together or independently. Return options are determined on a per-label basis by passing the appropriate JSON fields in the API request.
Customer’s choice returns
Retail or print at home
Let customers choose to start returns at home (print at home) or at retail using a label-free QR code.
Please note: You can’t enable both Traditional QR Code and Secure QR Code options at the same time.
Traditional QR Code
The Traditional QR Code option is flexible and convenient for customers who may want to print at home or in-store at Canada Post retail locations.
To enable the Traditional QR Code option, use:
{
  "createPublicKey": true
  "createQrCode": true
}
Secure QR Code
The Secure QR Code option adds extra fraud protection by limiting label printing to retail counters. This means that return labels can only be printed by retail clerks at Canada Post locations.
To enable the Secure QR Code option, use:
{
  "retailOnly": true
}What’s the public key? This key is used to generate the print-at-home label.
{
  "createQrCode": true
}
Box-free returns
Reduce friction and packaging for customers and increase convenience at drop-off with box-free returns.
How it works
The customer brings their unpackaged item to a retail location. Then, the retail clerk packages the item and prints the return label.
Please note: You can combine box-free returns with either the Traditional QR Code or Secure QR Code options (see above). The customer has the option to bring their item unpackaged if you allow box-free returns. The QR code only determines who prints the label (customer or retail clerk).
To enable box-free returns, use:
{
  "boxFree": true
}
If you don’t want to offer box-free returns, use:
{
  "boxFree": false
}
Box-free return requirements
Please note the following requirements to use box-free returns:
- Packaging is provided at the post office only when the return is authorized.
- All items combined for a single return must fit into a mailer with a maximum size of 47 cm x 61 cm (18.5 inch x 24 inch), plus an extra 5 cm (2 inch) lip.
- The weight of the returned items must be less than 22 kg (48.5 pounds).
If you need more detail, consult the Parcel Services Customer Guide Section 2.4.2.
Additional barcode returns
Enable faster processing and better tracking by including an extra scannable 2D or LINEAR barcode.
Please note: You can enable this type of return in combination with any other of the return options above.
To enable additional barcode returns, use:
{
  "customerBarcode": 1234567890
}
(replace ‘1234567890’ with any 16-character alphanumeric combination of your choice)
{
   "customerBarcodeType": "2D"
}
OR
{
  "customerBarcodeType": "LINEAR"
}
Please note: customerBarcode is a scannable graphic element, unlike customerRef1, which is text-only metadata.
API fields explained
Please note: This is not a comprehensive list of fields available within the Returns API.
| Field | |
|---|---|
createPublicKey | PurposeEnables print at home or traditional QR label. ApplicabilityWhen retailOnly is omitted or ignored. |
retailOnly | PurposeEnables secure QR code (printed only by Canada Post). ApplicabilityWhen createPublicKey is omitted or ignored. |
createQrCode | PurposeActivates the QR code feature, regardless of Traditional QR code or Secure QR code method. ApplicabilitySet to true to enable any QR code option. |
boxFree | PurposeEnables box-free returns. The default value is false. ApplicabilityWhen offering the box-free feature. |
customerBarcode | PurposeAdds a scannable barcode to the label (value is alphanumeric). ApplicabilityOptional |
customerBarcodeType | PurposeSpecifies LINEAR or 2D format. ApplicabilityWhen customerBarcode is used. |
customerRef1 | PurposeAdds a merchant reference number for tracking and reporting only (not scannable). ApplicabilityOptional but recommended. |
Sample requests
Traditional QR Code
Sample request with box-free and additional barcode
{
  "createPublicKey": true,
  "createQrCode": true,
  "boxFree": true,
  "customerBarcode": "ORD12345",
  "customerBarcodeType": "LINEAR",
  "serviceCode": "DOM.EP",
  "returner": {
    "name": "John Smith",
    "company": "Optional",
    "domesticAddress": {
      "addressLine1": "502 MAIN ST N",
      "city": "Ottawa",
      "province": "ON",
      "postalCode": "K2K0B1"
    }
  },
  "receiver": {
    "name": "Ryuko Saito",
    "company": "Optional",
    "email": "test@test.com",
    "receiverVoiceNumber": "111-111-1111",
    "domesticAddress": {
      "addressLine1": "23 jardin private",
      "city": "Ottawa",
      "province": "ON",
      "postalCode": "K1K4T3"
    }
  },
  "printPreferences": {
    "outputFormat": "8.5x11",
    "encoding": "PDF",
    "showPackingInstructions": true
  },
  "settlementInfo": {
    "paidByCustomer": "1234567",
    "contractId": "12345678"
  },
  "references": {
    "customerRef1": "ref1",
    "customerRef2": "ref2"
  },
  "notifications": {
    "notificationsList": [
      {
        "email": "test@test.com",
        "onShipment": true,
        "onException": true,
        "onDelivery": true
      }
    ]
  }
}
Label-free Secure QR code
Sample request with box-free and additional barcode
{
  "createQrCode": true,
  "boxFree": true,
  "retailOnly": true,
  "customerBarcode": "ORD12345",
  "customerBarcodeType": "LINEAR",
  "serviceCode": "DOM.EP",
  "returner": {
    "name": "John Smith",
    "company": "Optional",
    "domesticAddress": {
      "addressLine1": "502 MAIN ST N",
      "city": "Ottawa",
      "province": "ON",
      "postalCode": "K2K0B1"
    }
  },
  "receiver": {
    "name": "Ryuko Saito",
    "company": "Optional",
    "email": "test@test.com",
    "receiverVoiceNumber": "111-111-1111",
    "domesticAddress": {
      "addressLine1": "23 jardin private",
      "city": "Ottawa",
      "province": "ON",
      "postalCode": "K1K4T3"
    }
  },
  "printPreferences": {
    "outputFormat": "8.5x11",
    "encoding": "PDF",
    "showPackingInstructions": true
  },
  "settlementInfo": {
    "paidByCustomer": "1234567",
    "contractId": "12345678"
  },
  "references": {
    "customerRef1": "ref1",
    "customerRef2": "ref2"
  },
  "notifications": {
    "notificationsList": [
      {
        "email": "test@test.com",
        "onShipment": true,
        "onException": true,
        "onDelivery": true
      }
    ]
  }
}
Best practices
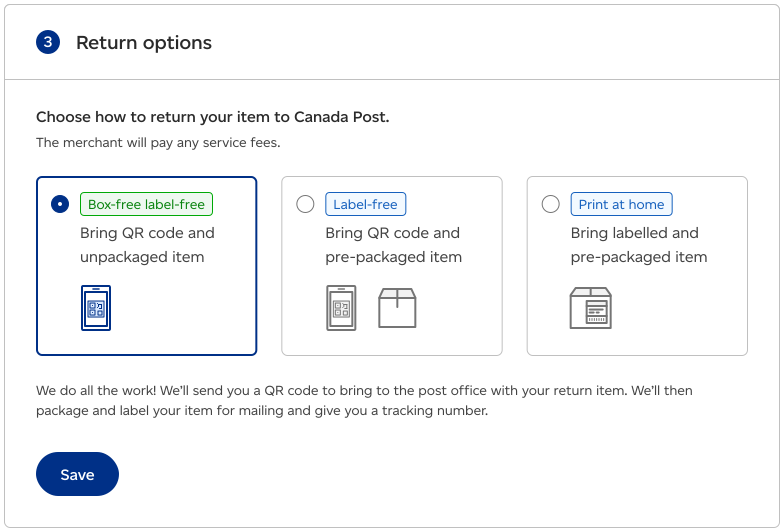
If you offer multiple return options, we highly recommend you clearly communicate these choices within your application's user interface (UI) to ensure a smooth and transparent experience for the customer.
We’ve provided some examples below using our own UI elements.
Example 1
Box-free label-free returns
Customer brings an unpackaged item (see Box-free returns)
In this scenario, the customer brings their unpackaged item to a retail location. The retail clerk packages the item and prints the return label.
Reminder: You can combine box-free returns with either the Traditional QR code or Secure QR code options (see above).
The item must fit within Canada Post's standard parcel dimensions after packaging.
Example criteria for box-free eligibility:

Example instruction for returning the original product packaging (if applicable/available):


Example 2
Traditional QR Code or Secure QR Code
In this scenario:
- The customer can choose to print the label at home from the PDF provided via the public key, or they can show the QR code at a retail location for a retail clerk to print the label (Traditional QR Code)
OR
- The customer must show the QR code at a retail location, where only a retail clerk can print the label (Secure QR Code)

Example 3
Print at home
In this scenario, the customer receives a downloadable PDF label.

Testing and troubleshooting
Common errors and how to fix them
Before trying anything else, we recommend reviewing our list of common errors and their codes.
Here are some other errors that may occur and their reasons.
Invalid contract ID
This error occurs because the customer number and contract number combination is invalid in the system.
Incorrect field combinations
One example of an incorrect field combination is the use of both retailOnly and createPublicKey within a single request.
- The retailOnly field is used to generate a secure QR code that can only be scanned and accessed by authorized Canada Post retail locations. The embedded shipment label information in the QR code isn’t accessible outside of these designated facilities.
- The createPublicKey field is used to generate a public URL for the shipment label, allowing the customer to print their own label (print at home option).
Since the primary function of retailOnly is to restrict label access to Canada Post retail locations, and the function of createPublicKey is to provide label access to the end customer, these two fields represent mutually exclusive options and can’t be used together in the same API call.
Validating QR code rendering and label output
To programmatically handle the PDF output and ensure it's displayed correctly, we advise you to:
- Use a PDF viewer or renderer to display the returned Base64-encoded PDF
- Verify the QR code by scanning it with a standard QR code reader to make sure it correctly links to the provided public URL
- Test the rendered label to make sure all elements (addresses, barcodes) are visible and readable
If you've exhausted the troubleshooting steps above and are still experiencing issues, you can contact our developer support team.